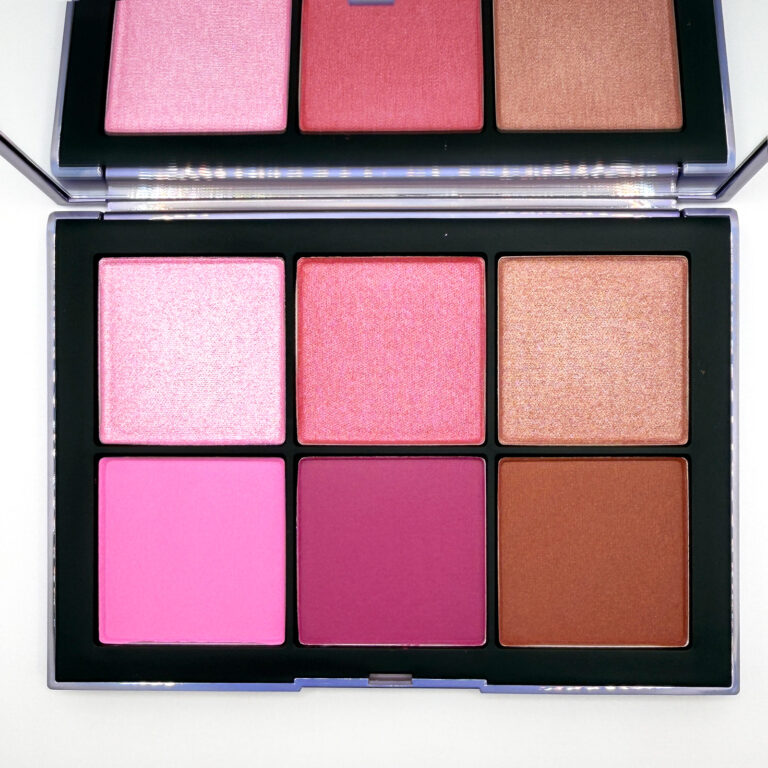
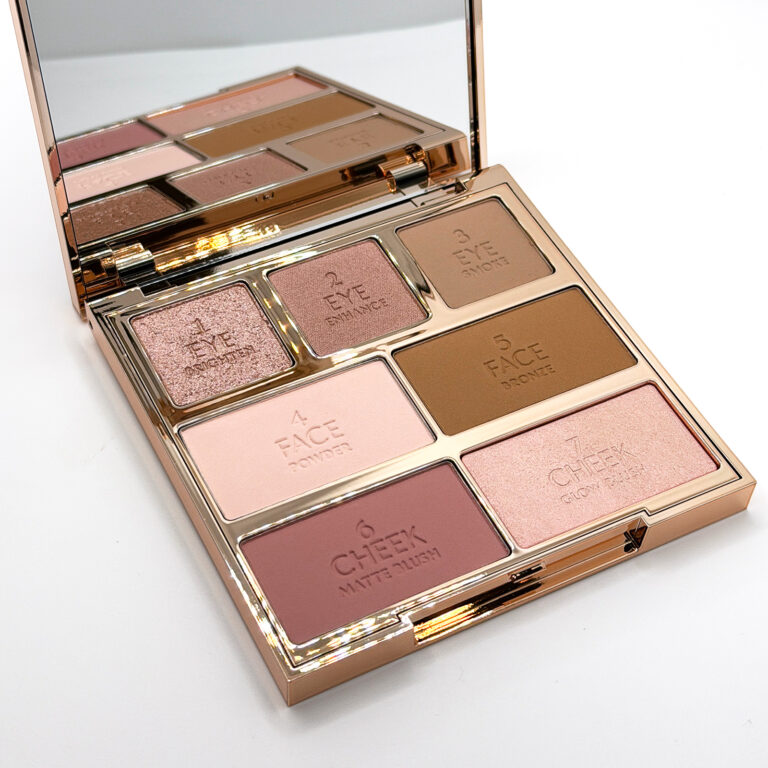
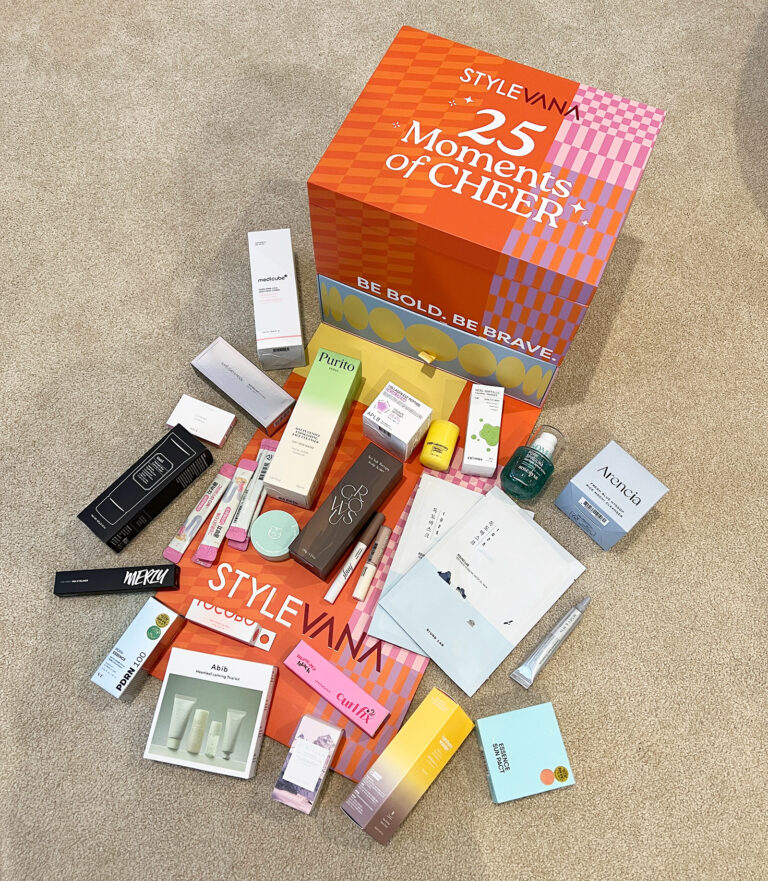
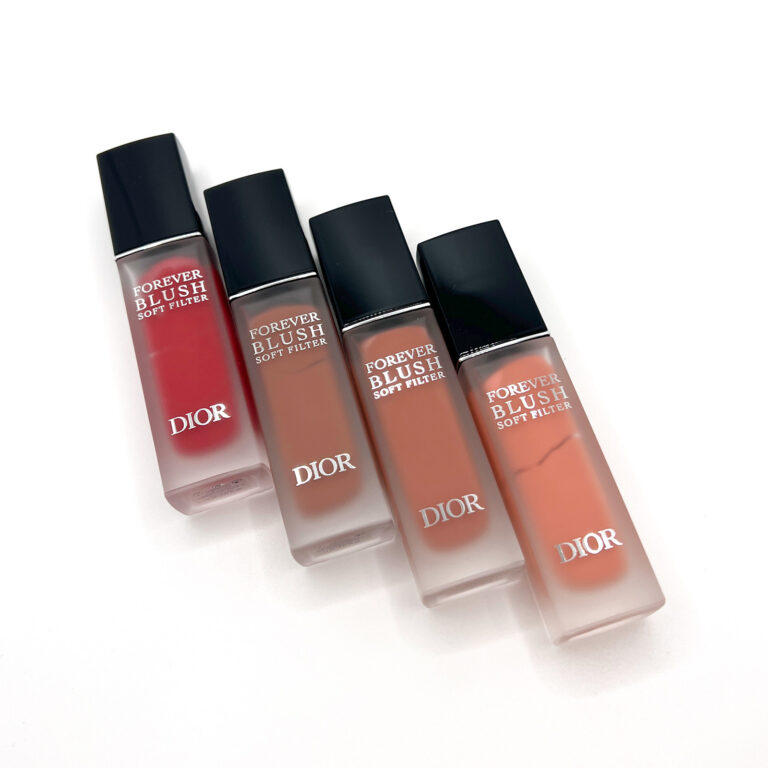
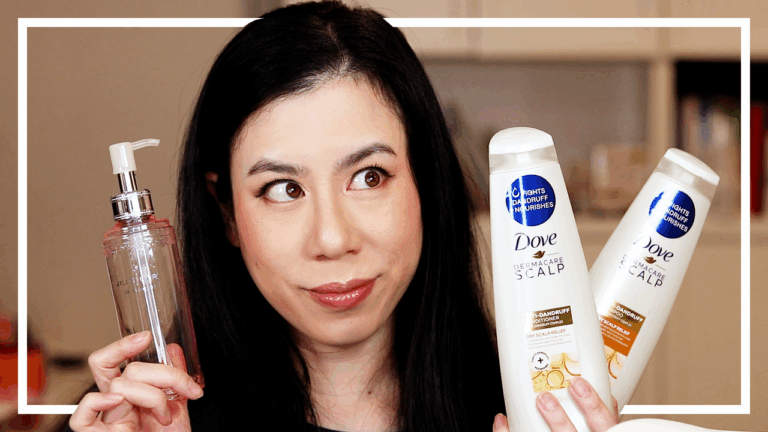
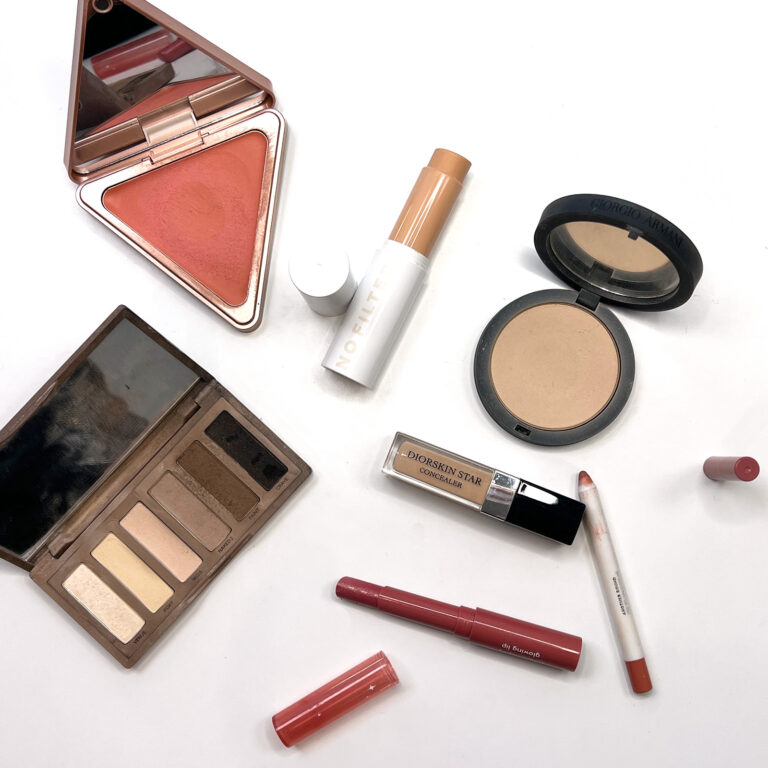
Manifest 2010: Final Costumes!

August 25th, 2010 § 6 Comments

Yay! The finished products :) I think like every other cosplayer, I can see the flaws and I just hope you guys can’t! I haven’t had an official shoot with either costume, so for now they won’t be appearing in their own gallery on Extreme Motion. I need to wait for warmer weather because I was literally freezing in all these photos hehe.

Shidou Hikaru

I can’t wait for warmer weather for this photo! I have a ton of ideas! But more importantly, I can’t wait till my Fuu and Umi are with me to do our official shoot!

Xiao Qiao

The fans! Oh, the relentless “fan” puns I got that day <3 There is a ton of detail missing from this costume, I really hope I finish it off before I get to my shoot~ These fans are not wind friendly (they hit me in the face several times), but they are very light and sturdy! Let's face it, awesome fans -made- this costume =D

Hope you enjoyed my costumes for Manifest 2010! Will annouce it here when I get my galleries for them on Extreme Motion up! Now it’s pretty much back to work for me, and hopefully once I have some time to recover (and catch up at work), I’ll be back on the sewing machine to bring you some new costumes :D Seriously, why can’t making costumes BE my job!?

  • Share/Bookmark

Manifest 2010: Costumes!

August 24th, 2010 § 4 Comments

Like every year, I completed 2 costumes for Manifest. The first (and most time consuming) was Shidou Hikaru thanks for her sword, gems etc. And the second was Xiao Qiao. Unfortunately I only have 1 in progress photo of Xiao Qiao :(

Shidou Hikaru

I wasn’t keen on paying $50+ for a petticoat, so I decided to make my own based on one Sefie lent me. It was a bit of a pain, but at least it turned out perfect AND was much cheaper!


Red skirt and tunic were some of my favourite parts. Probably not as much as the cape… it was a pain to make, but came out perfect!


Hikaru’s wig was not hard to do, just annoyingly time consuming :/ I had to order a second long wig and cut out a bunch of wefts from it. Sew three together till I had 8 “bunches”, then I would glue them one by one to the short wig layer by layer.

Then I braided it and that would be Hikaru’s seamless ponytail! It looked great, but it’s not something I’d be keen to try again :( Took me 3-4 hrs all up. I had to use this method because none of the stand alone wefts were long enough and using a clip in ponytail wouldn’t provide that natural seamless look.

The most annoying part is that length of the long wig wasn’t 100% even, so the braid is starting to come undone a little, will probably re-braid and apply some hair spray before I do my official shoot.

Xiao Qiao

Unfortunately like I said above, I have only one in-progress shot of Xiao Qiao :( The hardest part was creating a pattern for the skirt, seriously. The skirt is like an uneven wrap, so it did take a bit of trial and error, so glad it worked out somehow in the end. And dyeing this was no walk in the park either, took about 1-2 days total of continous soaking, dipping, drying, soaking, dipping, drying etc Still, the result was awesome! Very happy with how the dye creeped :)

I really should have embroidered this part to be more authentic, but I was running short of time and turned to my paints to save me :/ I hate when that happens!

  • Share/Bookmark

Manifest 2010: Propmaking (Swords, Resin & Fans!)

August 23rd, 2010 § 3 Comments

I apologise before hand, I will be spamming this blog with about 3 posts recapping the making of my costumes for Manifest this year :) Let the photo spam begin!

Swords

This year (like most years) I was one of the judges for the cosplay competition. I thought it would be a neat idea for all 3 judges to cosplay from the same series, so I suggested we do the Magical Girls from Magical Knight Rayearth! Fuu, Umi and Hikaru. I was Hikaru, and decided to make everyone’s gems and swords…. cause I’m nuts like that XD


All swords started out this way (except Umi’s, just because Umi’s sword was SOOO easy in comparison, hardly any progress shots for Umi)


After much sanding and slicing the blades were shaped to look like this! Much love and thanks to Toby for helping me with this, we rotated and took turns with the sander @_@ Took us over 2 weekends to finish this, by the end of it I was literally coughing up saw dust XD


So this is how the end of my sword was done, the reason for the groove on one side of each blade was so we could embed a strong thick piece of wood down the center, it would act as the inner core strength for each sword. When you weilding a 2 metre sword around, you want to make sure it is very strong!


Glueing everything together =D


I carved the hilt of Fuu’s sword out of flower foam! This stuff gets EVERYWHERE, Sefie warned me before hand so I made sure to do everything outside.


Painted the blades with chrome, love the finish for them :) Here I have to thank my dad, having had years of woodworking experience (he built a lot of the furniture we have at home), he taught me a lot about how to obtain smooth finishes etc


I made the hilt for my sword out of wonderflex, I -love- wonderflex. Later this year I’ll be doing another order for armour related cosplay =D


Swords are done, minus the paint and gems! I didn’t get a finished photo of all of them together :( But the judges and I are planning a group photoshoot very soon, so you’ll get to see them completed in all their glory soon!

Resin
This was the first time I tried my hand at casting crystal resin, and it certainly paid off! I think when you see the finish produce you’ll agree that crystal resin was the way to go rather than just painting the gems on.


There isn’t much too it. I made the models first out of clay, then I created mould from them (the yellow stuff), THEN I just poured in the correct amount of resin and I was good to go! :) Obviously there is a little more to it than just that (a lot of sanding involved and glossing) I made everyone’s gems, and whilst it took forever (and FYI wet resin tastes bitter… eww), I’m glad I managed to get through it because the pay off was awesome!

Fans


I bought the white fans from a store in America a while ago, and went paint / foam crazy on them! I only seem to have one in-progress shot. Using my makeup mixing plate to mix the paint @_@ My hands were covered in paint by the end of it lol

And that’s it for props! Next will be in-progress costume shots!

  • Share/Bookmark

Lookbook #18 – Sweet Sorrow

August 13th, 2010 § 5 Comments

Fables in Fashion Fables in Fashion

I was aiming for an innocent, sweet yet dark look for this entry. I’m… still not sure I completely hit the mark, but I think I came close. Altering the shape of my brows really pulled it all together. This is the wig I have set aside for some future Yuffie cosplay, and I love how it looks on me. Makes me ALMOST tempted to cut my hair this short, though I can see my partner freaking out already.

I’ve become so addicted to playing around with my “studio” lights (I say “studios” because all I’m really using are two $20 lamp shades from Ikea lol). See how different the feel of the four smaller photos are compared to the middle photo? and all I did was move closer to the camera by a few inches! Amazing :D After Manifest, I will probably get a couple more lights to see what else I can come up with :)

Instead of just listing the products I used, I’ve decided to turn them into tutorials instead. Hopefully people will find them to be a lot more useful :)

Fables in Fashion

How to reproduce:

Face
Apply 2 pumps of Revlon Photo Ready in Shell all over the face, don’t forget to blend into neckline. Conceal dark circles, redness and blemishes with Bobbi Brown Creamy Concealer in Beige. Then seal with a light dusting of MAC Select Sheer / Loose in NC15.

Eyes
Prime eyelids and around the eyes with NYX Eyeshadow Base in 02 (pearl white). Apply a liberal amount of NYX’s Eyeshadow in Rust all over the lid with a focus on the crease, wing out to the side and apply under the eyes as well. Apply NYX’s Eyeshadow in Prune just above your crease, blend well. Next using MAC’s Technakohl Liner Graphblack, line 2/3 of your upper and lower lash line, including your waterline. Then extend the liner to create a wing like effect. Use MAC’s Eyeshadow in Carbon to re-trace these lines and smudge it out, then use it to go over the crease with a wet brush to intensify the look. Remember to wing out your eyeshadow. Add some MAC’s Eyeshadow in White Frost to your brow bone and inner corner of your eye.

Curl your lashes, and apply two coats of Covergirl Lash Blast in Very Black.

For the brows, brush them out, then shape them using your concealer. I flatted my eyebrows by concealing the “high points”. Then extended them to align with my eyeshadow with Lancome’s Le Crayon in Poudre Mahogany. Apply a coat of clear gel if your brow hairs need to be set.

Lips
Prime my lips with any matte, non-greasy lip balm. Then outline and fill in my lips with NYX’s Jumbo Lip Pencil in Vixen. I use a lip brush for precision. Finish off with a liberal amount of Chanel’s Aqualumiere Gloss in 17.

Fables in Fashion Fables in Fashion
  • Share/Bookmark

Kick of Glam

August 11th, 2010 § Comments?

Fables in Fashion FOTD

Last cook off, after slaving in the kitchen I felt I needed a bit of a pick me up. I didn’t want to try anything too heavy, thought I’d go for a very very light smokey look (1 lid and 1 crease colour). Unfortunately right now my skin has decided to betray me and my eczema is taking over the areas around my eyes (hard to tell in the photo, much more obvious close up), which meant using liner on my upper lids was out of the question :(

Fables in Fashion FOTD

But I saw it has an opportunity to use my individual false lashes to add a kick of glam to my look :) Not only do they make my lashes look longer, they fake liner too~ I’ll never get sick of using them!

Fables in Fashion FOTD

  • Share/Bookmark

Lookbook #17 – Full of Heart

August 6th, 2010 § 4 Comments

Fables in Fashion Fables in Fashion

Usually, I sketch out my look books before I try them out, I also plan time in my schedule to shoot them. Not this look, I came home one night and felt rather inspired to play around with my individual false lashes. Glued one by one and the look just grew from there. Very “organic”.

I think this is one of my favourite looks thus far, it’s very simple yet still quite dramatic! This look has officially gotten me addicted to individual false lashes, I promise I will have to post up a tutorial eventually :)

Also I wanted to note, I didn’t use any eyeliner on my upper lash line, so all that is thanks to these amazing lashes!

Fables in Fashion

Products used:

Face
Bobbi Brown Skin Foundation SPF 15 PA+ Sand
MAC Mineralize Skinfinish Natural Light Medium
Bobbi Brown Creamy Concealer Beige

Cheeks
NARS Blush Orgasm
NARS Highlighter Albatross

Eyes
MAC Paint Pot Painterly
MAC Eyeshadow Naked Lunch
MAC Eye Kohl Facinating
Ylure Individual Lashes Medium
1000 Hour Individual Lashes Short
Covergirl Lash Blast Very Black

Lips
MAC Studio Finish Concealer SPF30+ NC20
MAC Lip Pencil Cherry
YSL Lip Twins 7C

Fables in Fashion Fables in Fashion
  • Share/Bookmark

Behind the Scenes – The Age Photoshoot

August 4th, 2010 § Comments?

I know this is kinda of late, but I never got around to sorting through the behind the scene photos Toby managed to take during the photoshoot, so I figured I’d share a few of them here :)


I love the studio we shot in, so much space and great lighting! If only I had a place as great as this to do my weekly Lookbooks ;)

Getting interviewed, but please note my lovely makeup artist’s dog! His name is Frankie, and he is the friendly dog ever!! I absolutely loved him <3 <3

Getting my makeup done, this is the 2nd time in my entire life I’ve had someone else do my makeup! I’m still on the fence as to whether I like it or would just rather do it myself…

The set up, time to get shooting!

My first costume, Kozue. I wish I could afford all the lights and reflectors used for my own photoshoots!

That’s a wrap :) It was an awesome experience I will be forever grateful for! If you would like to see more photos, head over to Extreme Motion~

  • Share/Bookmark

Review: Brush Guard

August 2nd, 2010 § 1 Comment

The Brush Guard

Pros:

  • Good way to store your brushes
  • Maintains brush shape

Cons:

  • Can damage brushes whilst traveling
  • Brushes take longer to dry

Price: $5.50US Variety Pack

Where: The Brush Guard

I first discovered these via some popular makeup gurus on YouTube thanks to some sponsored competition / event. Nothing similar existed in the market at the time (not sure about now?), and I figured I’d give it a go.

They are definitely an interesting asset to my brush storage regime, but certainly not the HG the youtube videos made them out to be. They are certainly useful in storing brushes at home whilst not in use, or for drying. But perhaps I dry my brushes too effectively? When I store them upside down to dry, not a single drop of water appears at the bottom of my cup, which makes me think I probably could do without the brush guard and let my brushes dry on their side. I’ve been using my brushes for a couple of years now using this technique, and no issues thus far. In that sense, it’s more a nice to have, than a need.

Keep in mind, when you do dry them in this manner, especially for the thicker brushes, it can take quite a bit longer. For example, my 109 MAC brush took about 2 days to dry, as opposed to under a day / over night when on it’s side.

One thing I wouldn’t do is use them for traveling if you store your brushes in a bag. The brushes will tend to move around, and my bristles become lodged in the netting of the brush guard. After the 12 hour flight, when I pulled my brushes out I found quite a few bristles bent backwards :( So for travel, stick to something that doesn’t contain netting, or if you insist on using the brush guard, keep your brushes in a brush roll to stop them from moving around.

Overall I don’t regret purchasing this product, but I most likely won’t be repurchasing once mine are worn out.

  • Share/Bookmark

Lookbook #16 – Rosella

July 30th, 2010 § 9 Comments

Fables in Fashion

Fables in Fashion

Inspired by an advertisement board for Napoleon Perdis I found at my local Chemist :) The colours were so vibrant, it instantly reminded me of the Rosella painting I have hanging in my study room.

I’m pretty fond of the drama behind this look, if I had a wig I think it would be a pretty convincing transformation! Which is exactly what I love about cosplay and makeup :) And we all know I’m a sucker for strong pigmentation~ Want vibrant colours for your eye shadows? Use a wet brush, it seriously works!

Fables in Fashion

Products used:

Face & Neck
MAC Prep + Prime Skin Base Visage
Bobbi Brown Skin Foundation SPF 15 PA+ Sand
MAC Mineralize Skinfinish Natural Light Medium
MAC Studio Finish Concealer SPF30+ NC20

Cheeks
NARS Blush Orgasm
NARS Highlighter Albatross

Eyes
Kate Gradical Eyes
Coastal Scents Matte 88 Palette
MAC Pigment Primary Yellow
MAC Fluidline Royal Wink
MAC Fluidline Blacktrack
L’Oreal Extra-Volume Collagene Black

Lips
MAC Lip Pencil Temperature Rising
NYX Lipstick Sunflower
MAC Lipglass Clear

Fables in Fashion

Fables in Fashion

  • Share/Bookmark

Grocery Shopping!

July 28th, 2010 § 2 Comments

Fables in Fashion

I’ve noticed a bit of a trend in my wardrobe, I tend to stick to solid colours, avoiding patterns etc. And I’ve figured out why.

Fables in Fashion

These same items of clothing can be easily incorporated into corporate wear, which up until recently has always been my “bread and butter” 5 days a week, 52 weeks a year for the last 3 years.

Fables in Fashion

In other words, they are versatile!

Fables in Fashion

I say recently because a week ago I was assigned a dream client (fashion industry), where everyday is “casual” clothes, oh the many outfits I will finally be able to explore! If only I could take photos of myself at work, without you know, getting awkward stares!

Fables in Fashion

That’s besides the point, when I go shopping for hardware supplies for cosplay, and food for the rest of the week I try and dress as casually and as chic as possible! Too bad none of the photos really show you the aqua colour on my lower eyelash line :(

Fables in Fashion

  • Share/Bookmark